


-30%


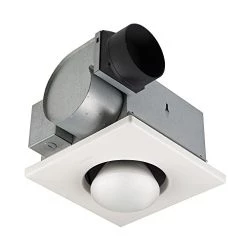


Broan-NuTone 162 Type IC Infrared Single-Bulb Ceiling Heater With Fan, 1, White
Original price was: $64.00.$44.80Current price is: $44.80.
- Free Shipping over $25
- Fast & reliable delivery options
- Enjoy top quality items for less
- Multiple safe payment methods

- Brand: Broan-NuTone
- Special Feature: HeaterHeater
- Color: White
- Product Dimensions: 10.25″D x 10.25″W x 0.88″H
- Mounting Type: Ceiling Mount
- Power Source AC: Heating Method Radiant
- Item Weight 7 Pounds: Heat Output 250 Watts
- ENERGY-EFFICIENT: Heats using a 250-Watt R40 or BR40 Infrared bulb (not included)
- EFFICIENT: Ventilation fan operates at 70 CFM and 4.0 Sones for a high-quality, quiet performance
- DISCREET: Type IC (Insulation Contact) unit is installed into your ceiling so all but the bulbs and white grille shows in your room for a clean and cohesive appearance
- EASY INSTALLATION: Sturdy steel housing, adjustable mounting brackets with keyhole slots, plug-in permanently lubricated motor, and 4″ round duct connector with tapered sleeves make installation logical and simple
- 70 CFM and 3.5-Sones
- Attractive white grille
- One bulb Heater and fan
7 reviews for Broan-NuTone 162 Type IC Infrared Single-Bulb Ceiling Heater With Fan, 1, White
Add a review
Related products
-62%
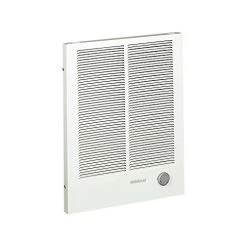
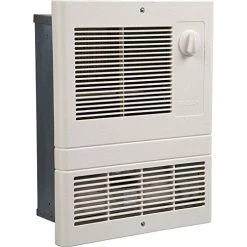
Broan-NuTone, White 198 High Capacity Wall Heater, Painted Grille, 4000/2000 Watt 240 VAC, 2000/4000
Original price was: $244.00.$92.00Current price is: $92.00.
-30%


Original price was: $66.99.$46.89Current price is: $46.89.
-30%


Original price was: $50.99.$35.69Current price is: $35.69.
-30%

Original price was: $9.99.$6.99Current price is: $6.99.
-29%


Original price was: $132.99.$94.00Current price is: $94.00.
-30%

Original price was: $40.99.$28.69Current price is: $28.69.
-41%
Original price was: $164.95.$98.00Current price is: $98.00.
-57%
Original price was: $225.00.$96.00Current price is: $96.00.
PY –
I bought this as a direct replacement to ease installation since the vent would match up. It’s a fairly complex installation requiring sheet rock repair. The motor on this unit is smaller than the old one. Unit can be wired to operate light in sync with fan or independently. I only have two switched in my bathroom to operate 3 functions (vanity light, fan, fan light) so two must operate in sync. I don’t want the fan to come on with the vanity light and I don’t want the fan light to come on with the fan so my solution was to wire the fan light to operate with the fan and simply screw in a bulb loosely so it does not light. I didn’t want to leave the socket exposed to moisture. I also didn’t want to put in a 250 watt heat bulb since that’s a waste of electricity while showering and after to vent the steam.The only problem I found with the unit was the vent connection is not tapered so it was a challenge to insert it into an existing vent pipe. I ended up breaking the fragile plastic damper hinge. Since it did not affect the function, I just removed it.Items needed: plastic sheets, sheet rock saw, foam board or cardboard, sheet rock repair compound, putty knife, socket set, sheet rock screws, optional drill to mount new fan, external light source since you will need to turn off the power to the bathroom.Steps for installation:** Turn off the power to the fixture at the fuse box and mark the switch to make sure no one turns it back on while work is in progress ***1. Create a dust chamber around the fan with plastic to minimize sheet rock dust.2. Cut a 16″ square hole around the existing fan making sure you cut half way into the existing mounting studs. A small circular saw helps but it can be done with a hand saw or even a regular circular saw if you’re careful.The fan mounts on rails attached to studs 16″ apart. The rails run along the mounting screws on two sides.3. Remove old fan and replace. I chose to screw in the new rails instead of nailing them to minimize vibration and insure a tight mount. The vertical alignment is not critical since it can be adjusted.4. Wire the fan and test. I also duct taped the vent connection.5. To repair the sheet rock, create a template with a piece of foam board or cardboard. Smear toothpaste on the fan vent box so the size can be transferred to the template when pressed. Transfer the template to a piece of sheet rock. It’s better to error on the side of making the replacement too big. You can always shave it with a razor to fine tune.6. Mount the sheet rock piece by screwing it into the studs. This is why it’s important to cut the hole 1/2 way into the existing mounting studs. Adjust the height of the fan to minimize gaps between the sheet rock and fan housing.7. Apply repair compound, sand, and repaint. If your ceiling is textured, do your best to match the texture. Do not use the shower until 24 hours after painting.
ALF Engineer –
I purchased this to replace a single non-IC(Insulation Contact) heat lamp fixture in my second floor bath. Since the bathroom has a window, the fan isn’t required. I wanted just a heat lamp but one that was rated as IC.I considered a true heater instead of the heat lamp but decided that wasn’t worth the issues of potentially changing the electrical circuit. We’ve had these infra-red lamps in both our bathrooms for years and they are just enough to take the chill off.Unfortunately I couldn’t find a unit with a single lamp rated IC. Broan / Nutone have IC units with dual lights but their single light offering with no fan is non-IC. I decided to get this IC model with a fan.Nutone has an identical model 9417DN. I’ve seen both and they appear identical.I was installing as a remodel from the attic above. It would have been nice for a drywall cut template to assist.The only issue I had with the installation was the cover for the electrical box that uses a sheet metal screw to attach. Once the unit is in place the ceiling joists make this a blind fit from above. Where mine was located I had to use a small socket set to screw it tight. Since this is very unlikely to be a maintenance item, I guess it’s a don’t care that it’s hard once…but either a top screw, a tool less clip or electrical access from the bottom would have been a much better solution for me. If you are installing in new construction and the drywall isn’t in place yet you won’t even notice this…until you have to replace the unit 20 years later!The ducting went smoothly and the fan is reasonably quiet and the heat lamp works well. I have about 10 feet of 4″ ducting to a flush mount wall louver. The fan has enough oomph to open the louvers when on. Ventilation is good.For the price I’m happy
JimE –
Ya I remember it like it was yesterday! Crawling threw that dirty attic to be pinched in a corner cutting holes and running wires. I was really not looking forward to it being 20 years older and less agile.Then I saw a review stating you could just replace the fan! Could this be true? I had the Nutone Fan.And sure enough, perfect fit !!! just unscrewed 2 bolts and an AC Plug. Genius! What a lifesaver!Took me longer to clean off the dirt and a quick spray paint on the old box then to install the fan itself. Actually after I was done I cleaned up the old fan, oiled it up and the dam thing worked again! lol
Living Up North –
M wife refused to turn on the fan when she showers so the orginal exhaust fan got rusty. This was an exact replacement. I was able to get the old fan out of the hole in the wallboard and get the new on installed thru the hole by putting it thru the hole in pieces. Works fine now. Put a sign on the show that say FAN as a reminder to her.
Joseph –
I always liked the heat lamps in hotel bathrooms, so I thought I would try one in my house. I love this thing, it makes the bathroom far more comfortable on cold mornings. The fan seems to work well and is not very loud. I installed a timer switch with my heat lamp for safety’s sake. You will need to spend some time in your attic to install this, which can be pretty awful on a hot day, especially if you have fiberglass blown insulation in your attic. Some basic knowledge of electrical will be necessary to safely install this. I was able to install mine without hiring an electrician or HVAC worker, but it would have been a lot easier if I had just paid someone else to work in my miserable attic.
bill rutzler –
This light/fan combo by Braun hasn’t changed much over the years, so the replacement install was quick and easy.This new unit replaced a 30 year old crusty unit during a bath remodel.
G Jones –
I needed an exhaust fan with a heat lamp also. Since I was installing another bathroom I had installed a Broan in my main bathroom. Went smooth and works great. Highly recommend this fan/heat light.