

 2")
-32%


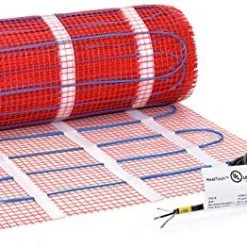


20 Sqft HeatTech 120V Electric Tile Radiant Floor Heating Mat
Original price was: $140.35.$96.00Current price is: $96.00.
- Free Shipping over $25
- Fast & reliable delivery options
- Enjoy top quality items for less
- Multiple safe payment methods

- Voltage: 120V; Amps: 2A; Watts: 240W;
- Heating cable is only 1/8″ thick and will not raise floors significantly. Cold lead: 10ft. Cable spacing: 3″. System output: 12Watts per sq.ft (41 BTU/sq.ft);
- 120V mats can be combined to heat up to 150sq.ft. of space using a single thermostat.
- UL listed.
| Size | 10 sq ft, 15 sq ft, 20 sq ft, 30 sq ft, 35 sq ft, 40 sq ft, 50 sq ft, 60 sq ft, 70 sq ft, 80 sq ft, 90 sq ft, 100 sq ft |
|---|
8 reviews for 20 Sqft HeatTech 120V Electric Tile Radiant Floor Heating Mat
Add a review
Related products
-30%


Original price was: $38.77.$27.14Current price is: $27.14.
-30%


Original price was: $67.09.$46.96Current price is: $46.96.
-30%

Original price was: $50.99.$35.69Current price is: $35.69.
-30%

Original price was: $24.48.$17.14Current price is: $17.14.
-30%

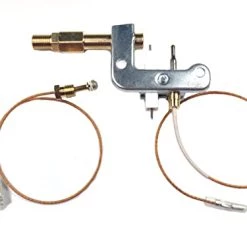
F273401 73404 Pilot Assembly For Portable Buddy Mr Heater MH9B MH9BX And Dewalt Small Propane Heater
Original price was: $26.55.$18.59Current price is: $18.59.
-30%


Original price was: $13.99.$9.79Current price is: $9.79.
-41%
Original price was: $164.95.$98.00Current price is: $98.00.
-30%
Original price was: $64.00.$44.80Current price is: $44.80.
Smartphone Nutter –
After looking for an under tile radiant heating solution, I settled on this product for several reasons, the ability to simply cut the mat allowing me to fit the matt neatly into an unusual pattern to fit the walk area in my new half bath off of a newly constructed office. What has really impressed me is that the heat produced by the tile in the half bath radiates so well, it actually keeps my whole office cozy!The installation instructions are concise, but sufficient for anyone with basic electrical skills to install this product. Installation involves putting down a thinnest over the Matt once you have the pattern stapled down. I highly recommend using a thermocouple and thermostat as this just makes things far more convenient. If you are not home automation, make sure your thermostat can communicate in the appropriate communications protocol.Of course, it goes without saying that it is always recommended to have a dedicated run to a dedicated circuit breaker.If you are a competent DIY’r, or have an electrician take care of the installation, you can look forward to years of warm comfortable heated flooring.
iamlucas –
I installed this in my bathroom to keep the tile heated. The product works as advertised, no complaints there. I would suggest an improvement to the instructions however. They mention two installation techniques. The first is to install thinset over the mesh, let it cure, then install another layer of thin set/mortar with your tile. The second is to lay down the thin set/mortar and apply tile in one step. This second method is for advanced/very skilled folks. The problem is that if you don’t cover your floor completely with the heated mat, you will have tiles which are not level. They will set partially on the wire, and partially on your subfloor. This makes tiling difficult. To make this job MUCH easier, lay the mesh down on your subfloor, and pour self leveling compound over it and let it cure. This will give you a very level flat surface upon which to place your tile. As a bonus, with the self leveling compound, you won’t have to worry about nicking the wires with your trowel, which could easily damage the unit, rendering it worthless.
Eric Cloninger –
We had a tile heater put in our bathroom about 10 years ago when we remodeled. When we started to remodel our kitchen we decided to put in another tile mat. I did some research into how the mats are constructed and after looking at the HeatTech web site, I felt comfortable doing the work myself along with the tile work.I was able to cut and mold the mesh of this mat into the shape of the area in front of the stove and sink with no problems. The bottom of the mat is sticky enough that it adhered to the clean concrete floor of the kitchen and stayed put while I troweled on the mortar. I was using an 18″ tile with a 1/4″ notch on the trowel and that covered the mesh and the wire without any problem. There is no noticeable height difference in the tile with the mat and those without. If you used a smaller notch size, you would need to be more careful because the wire is probably 1/8″ itself.FWIW, I chose to install two sensors and place them several feet apart. When our bathroom mat was installed, they only used one. It stopped working after a few years and so the mat stays on full time and the controller does little other than supply power. We keep it at low temps through the winter and then turn it off in the spring. In a way, it’s nice because our bathroom is always a comfy 78F degrees.
JA –
anyhow, there are 2 things you may need pay attention.First of all, When I bought this item, I followed the Amazon’s recommendation to the thermostat, which is Actually Not right. It was recommended to Honeywell TH115-A-120S, IT SHOULD BE TH115-AF-120, which comes with remote sensor. Pls. pay an attention !Second, the wire to the mat is a bit thick that is very hard to lay down below the tile. You will have to trim your tile to thinner.that’s it, and good luck to everyone!
Russian speaker –
Put it under tile in the newly remodeled bathroom. It does take some time to heat the floor, but feels really nice. I use programmable thermostat and start heating about 40 minutes before we get up in the morning. With 6 hour a day heat cycle (morning and evening) I don’t see impact to my electric bill.I ended up being about 15″ short for the mat to extend all the way to toilet, and can definitely feel the difference in the area it doesn’t hit. Measure carefully!
Callum Odonnell –
This is a great product- we have installed this in 2 different bathrooms now within the last year, and no problems noticed thus far. Easy to follow directions, and an easy hook up for an electrician. We followed the directions using a sub-leveling compound to install – and although it is an extra step, we believe it made the tile installation easier, b/c it will help prevent any “damage” to the floor mat wires when spreading the mortar with a metal trowel. We would recommend this product.
anthony –
I absolutely Love this Product it was deivered with no problems there was nothing broken nothing Damaged or missing Which is getting harder and harder these days for some reason For the most part The description was pretty accurate the only problem it was a little different in size that was written up in the Description. it was a little disappointing that’s why it didn’t get 5 stars but the product itself Is great its working fantastic. if you pay attention to details and read all directions for what to do and what not to do you will be in great shape great shape. You don’t have to be in the trades to install this product. I would definitely recommend This and have recommended it to many other people But I’ve told them if you have any doubt whatsoever call the company to get the right size if there’s any doubts While Doing the installation And hooking up the buried wires that would be underneath the tile and connect it to the electric mat ( I’m referring to the thermostat wire )that Operates the Electric heat mat, I ran a second backup wire In case something should happen over time to the original wire the whole project would it be deemed useless , I also ran the wire up to the thermostat but again it’s not hooked up it’s just a backup . In the event it would stop working I could just hook up the extra wires I ran without ripping everything out.
Jean Claude –
Works well. I installed in end of spring so haven’t really tested it out well. I did turn on for a few minutes until it warmed up to 90 degrees and the warm floor felt nice. Can’t wait until the colder months to have it on